Integration example
In this tutorial we go through the basic steps necessary to establish a Relationship to another Identity and send Messages between two Identities with an existing Relationship. This will create a better understanding of these processes, which will help you automating them for your organization.
It is not mandatory to have an own Connector installed. The following steps include small interactive pieces of the Connector’s API documentation that, when executed, fire Requests on a Connector we provide for testing purposes.
If you would like to use it, start by checking the health of the Connector:
Nevertheless, you are welcome to use your own Connector, either with a REST client (e.g. Insomnia or Postman) or by using the RapiDoc documentation (/docs/rapidoc) hosted on your Connector.
The payloads for the Requests that are sent during this tutorial contain placeholders marked with <...>.
You need to replace them with values before you send the Requests.
Prerequisites
- If you want to use your own Connector for executing the examples:
- Install the Connector
- Make sure the Sync Module and the Server-Sent Events Module are disabled (because in this tutorial we will synchronize manually via the HTTP endpoint). We are also neither utilizing the Webhooks Module nor the Message Broker Publisher Module, even though using one of them is recommended in productive use.
- Make sure the docs are enabled for the documentation route to work
- Get the API key that was configured during installation of the Connector (it needs to be sent in the
X-API-KEYheader of every HTTP Request)
- You need the enmeshed App with a minimum version of
4.0.0installed on your mobile device.
Establishing Relationships
In order to communicate with another Identity, a Relationship to that Identity is required. Thus, in this first part of the tutorial you will learn how to establish a Relationship between your Connector and another Identity. In this example the other Identity will be an App. However, it could be another Connector, as well, e.g. if two companies want to exchange data securily without opening a port or network.
The way we will establish the Relationship is via a RelationshipTemplate. This is created by the Connector and contains its display name, as well as the data it would like to receive from the other Identity. Then, the App user fills out all required information of the RelationshipTemplate and sends a pending Relationship to the Connector. It in turn accepts the Relationship, which results in an active Relationship.
Connector: Create an Attribute
Firstly, let’s create a display name for our Connector.
While communicating with the other Identity in the subsequent steps, we will choose to share this display name.
Technically, for this we need to create an IdentityAttribute with a value of type DisplayName for our Connector.
To do so, execute POST /api/core/v1/Attributes with the following payload:
{
  "content": {
    "value": {
      "@type": "DisplayName",
      "value": "Demo Connector of integration example"
    }
  }
}
Corresponding interactive API docs excerpt:
Save the |
Connector: Test your Request’s Validity
Next, we want to create a RelationshipTemplate, that can be used by the App to send a pending Relationship to our Connector. The content of the RelationshipTemplate can be widely configured, but for simplicity we will use a Request with just two RequestItemGroups in our example. On the one hand, we want to share an Attribute with the App, namely the display name of our Connector we created in the previous step. For this, we use a ShareAttributeRequestItem. On the other hand, we use ReadAttributeRequestItems to receive Attributes from the App. Let’s assume the Connector needs to know the given name and surname of its contact to create a Relationship and, additionally, offers the option to specify an email address for communication.
{
  "content": {
    "items": [
      {
        "@type": "RequestItemGroup",
        "title": "Shared Attributes",
        "items": [
          {
            "@type": "ShareAttributeRequestItem",
            "mustBeAccepted": true,
            "attribute": {
              "@type": "IdentityAttribute",
              "owner": "<the owner property of the Attribute created above>",
              "value": {
                "@type": "DisplayName",
                "value": "Demo Connector of integration example"
              }
            },
            "attributeId": "<the ID of the Attribute created above>"
          }
        ]
      },
      {
        "@type": "RequestItemGroup",
        "title": "Requested Attributes",
        "items": [
          {
            "@type": "ReadAttributeRequestItem",
            "mustBeAccepted": true,
            "query": {
              "@type": "IdentityAttributeQuery",
              "valueType": "GivenName"
            }
          },
          {
            "@type": "ReadAttributeRequestItem",
            "mustBeAccepted": true,
            "query": {
              "@type": "IdentityAttributeQuery",
              "valueType": "Surname"
            }
          },
          {
            "@type": "ReadAttributeRequestItem",
            "mustBeAccepted": false,
            "query": {
              "@type": "IdentityAttributeQuery",
              "valueType": "EMailAddress"
            }
          }
        ]
      }
    ]
  }
}
Before we actually create the RelationshipTemplate, we want to ensure the validity of the Request and its items.
To do so, execute POST /api/core/v1/Requests/Outgoing/Validate with the Request.
Corresponding interactive API docs excerpt:
Even though the Requests are validated during the RelationshipTemplate creation, you should not skip this step, as it gives you additional information in case of validation errors.
Connector: Create a RelationshipTemplate
If the Connector states your Request as valid, we can create the RelationshipTemplate.
To do so, we use the content we just validated in POST /api/core/v1/RelationshipTemplates/Own.
Furthermore, we specify an expiration date, which is located in the future, and restrict the access to a single allocation.
{
  "maxNumberOfAllocations": 1,
  "expiresAt": "2024-12-31T00:00:00.000Z",
  "content": {
    "@type": "RelationshipTemplateContent",
    "title": "Connector Demo Contact",
    "onNewRelationship": {
      // <the value of the 'content' property validated in the previous step>
    }
  }
}
Corresponding interactive API docs excerpt:
Save the |
Connector: Create a QR code for the RelationshipTemplate
Now, to allow the App to retrieve the RelationshipTemplate, we create a QR code, that can be scanned by the App.
For this, execute the GET /api/core/v1/RelationshipTemplates/{id} route (Accept Header: image/png) and use the id of the RelationshipTemplate from the previous step as the value for id.
Corresponding interactive API docs excerpt:
App: Initiate a Relationship
When the App is opened and no profile has been created yet, the user must create one. From the profile overview, the user can add a new contact using the “Add Contact” option. A QR code must be scanned to complete the process.
Scanning the QR code should result in a screen similar to the one below, where you can see the information that you added as content to the RelationshipTemplate.
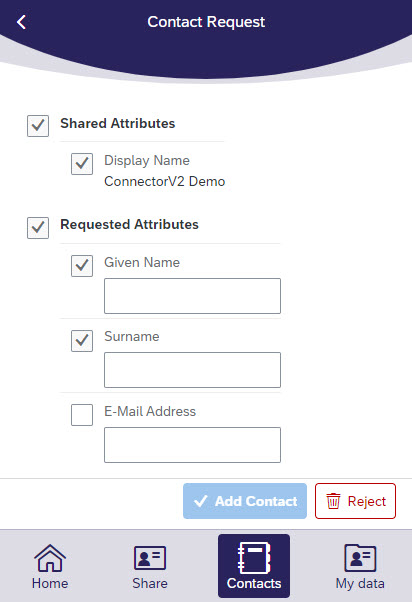
Finally, fill out the required fields and click on “Add contact” to send the Relationship.
This will initiate a Relationship between the App and the Connector.
This Relationship has the status Pending for now.
Connector: Accept the Relationship
In order to move the Relationship into the Active state, we now need to accept the Relationship with the Connector.
To do so, we synchronize updates of the Backbone, which will fetch all changes that occurred since the last time this endpoint was executed.
Corresponding interactive API docs excerpt:
The synchronization causes the transport.relationshipChanged Connector event to be triggered, which should be listened to in order to get the Relationship in status Pending.
We can also get the Relationship via GET /api/core/v1/Relationships.
Should you be repeating this tutorial, you could e.g. filter by the id of the RelationshipTemplate from earlier via GET /api/core/v1/Relationships?templateId=<id> if you use a different RelationshipTemplate.
Corresponding interactive API docs excerpt:
Example:
{
  "result": [
    {
      "id": "RELmJj25x2bZW0VXzAiQ",
      ...
      "status": "Pending",
      "peer": "did:e:_________________"
    }
  ]
}
Save the |
Corresponding interactive API docs excerpt:
Now the Relationship is in the Active state, so we can start to communicate with the opposite Identity, which we will do in the next part of this tutorial.
For this, we will need the address of that Identity.
It can be found in the Response, when accepting the Relationship.
Save the |
Sending and Receiving Messages
After having established a Relationship with an Identity, we can start to exchange Messages. enmeshed defines different types of Messages. In this tutorial we will focus on Messages of type Mail, which can be compared to a classic email: it is possible to specify one or more recipients, a subject and a body, as well as to add attachments.
Sending a Message with a Connector
Firstly, we will send a Message from the Connector to the App.
For this, we need the address of our peer, that we copied in the previous step, and insert it in the fields recipient and to.
Further, the subject and body properties can be modified with some custom content.
{
  "recipients": ["did:e:_________________________________"],
  "content": {
    "@type": "Mail",
    "to": ["did:e:_________________________________"],
    "subject": "Welcome",
    "body": "Hello. We are pleased to welcome you as our customer.",
    "bodyFormat": "PlainText"
  }
}
Corresponding interactive API docs excerpt:
After having sent the Message, you should receive a push notification on your phone. Open the enmeshed App, navigate to “Contacts” and select the Relationship. You should see the Message in the list. Tapping on it reveals more details.
Receiving a Message with a Connector
Next, we are going to send a Message from the App to the Connector. So, open the enmeshed App, navigate to “Contacts” and select your Relationship. Then, tap on “New Message”, enter a subject and body and tap on “Send”.
In order to fetch the Message, we need to synchronize the Connector with the Backbone again.
Corresponding interactive API docs excerpt:
After syncing, all Messages can be displayed with the GET /api/core/v1/Messages route.
Additionally, the Event transport.messageReceived is triggered after a Message is received.
If you use the Message Broker Publisher Module or the Webhooks Module to subscribe to this event, you will receive the information whenever a new Message arrives.
Corresponding interactive API docs excerpt:
The response should contain a Message with the content you entered in the App.
What’s next?
Now that you have successfully established a Relationship and exchanged Messages, you can further explore the enmeshed API. You can for example:
- explore the enmeshed data model and learn more about the objects you used during this tutorial and the objects you will encounter in the future
- learn how to send Requests via Messages with your established Relationship
- dive deeper into creating and sending Requests via RelationshipTemplates