Connector Tutorial
In this tutorial we go through the basic steps necessary to establish a Relationship to another Identity and send Messages between two Identities with an existing Relationship. This will create a better understanding of these processes, which will help you automating them for your organization.
The following steps include small pieces of the Connector’s API documentation that, when executed, fire requests on a Connector created for testing purposes. So if you don’t have an own Connector installed, feel free to use the samples directly. Otherwise you can use your own Connector either with a REST client (e.g. Insomnia or Postman) or by using the RapiDoc documentation (/docs/rapidoc) hosted on your Connector (you have to enable docs on your connector for the documentation route to work).
Prerequisites
- If you want to use your own Connector for executing the examples
- Install the Connector
- Make sure the Sync Module is disabled (because in this tutorial we will synchronize manually via the HTTP endpoint)
- Get the API key configured for the Connector. Ask the person who installed the Connector for it.
-
You need the Enmeshed App installed on your mobile device.
- Diagramm
Establishing Relationships
In order to communicate with another Identity, a Relationship to that Identity is required. In this first part of the tutorial you will learn how to establish a Relationship between your Connector and another Identity. In this case the other Identity will be the using the App, but it could be another Connector as well.
Connector: Create a Relationship Template
Start by creating a so called Relationship Template on the Connector. You can do so by calling the POST /api/v1/RelationshipTemplates/Own route. Use the following JSON in the request body:
{
    "maxNumberOfRelationships": 10,
    "expiresAt": "2022-06-01T00:00:00.000Z",
    "content": {
        "attributes": [
            {
                "name": "Thing.name",
                "value": "Contoso"
            }
        ],
        "request": {
            "required": [
                {
                    "attribute": "Person.familyName"
                },
                {
                    "attribute": "Person.givenName"
                }
            ],
            "optional": [
                {
                    "attribute": "Comm.email"
                }
            ]
        }
    }
}
Corresponding interactive API docs excerpt:
Remember the id of the Relationship Template that you can find in the response. You will need it in the next step.
Connector: Create a Token
Now you need a so called Token. Since we will use the Enmeshed App to send a Relationship Request to the Connector, we further have to create a QR Code one can scan with the App to retrieve the Relationship Template and send a Relationship Request to the Connector. Execute the POST /api/v1/RelationshipTemplates/Own/{id}/Token route to create such a Token. Use the ID of the Relationship Template from the previous step as the value for id. Make sure you select image/png as the Accept header by selecting the corresponding value from the dropdown list in the bottom right of the Rapidoc route section.
We don’t care about the parameters here, so just send an empty JSON in the request body.
Corresponding interactive API docs excerpt:
App: Send a Relationship Request
Open the created QR Code, start the Enmeshed App, select or create a profile, navigate to “Kontakte”, click on “Kontakt hinzufügen” and scan the QR Code. This will open a screen similar to the one below, where you can see the information that you have added as content to the Relationship Template.
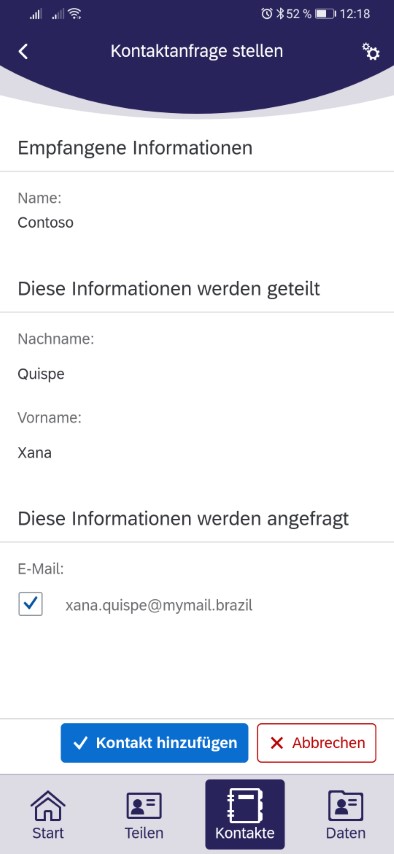
Finally, click on “Kontakt hinzufügen” to send the Relationship Request. This will create a new Relationship to the Backbone, which has the status Pending.
Connector: Accept the Relationship Request
In order to move it into the Active state, you now need to accept the Relationship Request with the Connector. In order to do so, first execute the POST /api/v1/Account/Sync route, which will fetch all changes that occurred since the last time this endpoint was executed.
Corresponding interactive API docs excerpt:
In the response you will receive the created Relationship, which contains corresponding Relationship Creation Change.
Example:
{
  "result": {
    "messages": [],
    "relationships": [
      {
        "id": "RELmJj25x2bZW0VXzAiQ",
        ...
        "status": "Pending",
        "peer": "id19Sy75wjCWhQSxsbMiGLn6iSBfWvQmot5b",
        "changes": [
          {
            "id": "RCHUwBw7BWlROPlEjb51",
            ...
            "status": "Pending",
            "type": "Creation"
          }
        ]
      }
    ]
  }
}
Remember the id of the Relationship (REL_________________) as well as the id of the first Relationship Change (RCH_________________) in the changes array and use them as input to the PUT /api/v1/Relationships/{id}/Changes/{changeId}/Accept route. You can leave that request body as it is.
Corresponding interactive API docs excerpt:
Now the Relationship is in the Active state, so we can start to communicate with the opposite Identity, which we will do in the next part of this tutorial. In order to do so we will need the Address of that Identity. So in the response of the last request look for the peer property and write down its value. It should start with id1.
Sending and Receiving Messages
After you have established a Relationship to an Identity, you can start to exchange Messages. Enmeshed defines different types of Messages. For this tutorial we will focus on Messages of type Mail, which you can compare to a classic email: you can specify one or more recpipients, a subject and a body, as well as add some attachments.
Sending a Message with a Connector
To send a Message, all you need to do is call the POST /api/v1/Messages endpoint. You can use the content below, while replacing the placeholders in recipients and to with the Address you copied previously. You can further modify the subject and body properties to add some custom content.
{
    "recipients": ["id_________________________________"],
    "content": {
        "@type": "Mail",
        "to": ["id_________________________________"],
        "subject": "Welcome",
        "body": "Hello. We are pleased to welcome you as our customer."
    }
}
Corresponding interactive API docs excerpt:
After you have sent this request, you should receive a push notification on your phone. Open the Enmeshed App, navigate to “Kontakte” and select your Relationship. You should see the Message in the list. You can show details by tapping on it.
Receiving a Message with a Connector
Next we are going to send a Message from the App to the Connector. Therefore, open the App, navigate to “Kontakte” and select your Relationship. Next, tap on “Neue Nachricht”. Enter subject and body an tap on “Absenden”.
In order to fetch the Message, we need to call the POST /api/v1/Account/Sync endpoint again.
Corresponding interactive API docs excerpt:
The response should contain a Message with the content you entered in the App.